

Tablet-Weaving Intro with samples
by historical novelist Joyce Holt
TWIST
Most weavings made on rigid frames -- like floor looms, table looms, and inkle looms -- lie flat, whether woven into a plain tabby (made with two harnesses) or a multiple-harness pattern like twill.
Tablet weavings, however, have an inherent twist to the cords. Here you can see the twist imparted to the weaving itself, which happens when all the cards are threaded in the same direction.

Each card in this sample is warped with acrylic worsted yarn: a purple strand threaded through hole A, dark blue in B, pink in C, yellow in D. Tablet-weaving is warp-faced. You don't see the weft except on the edge, at each turn of the shuttle. This example has a contrasting weft in black.

Each turning of the cards changes the lay of the strands (to run above the shed, or below it), in some ways like a four-harness loom. (The loom simply lifts and drops different sets of threads. It doesn't twist the warp strands like tablet-weaving does.) Not only does this card-turning motion twist the strands on the weaver's side but also on the far unwoven side, as shown below.

Notice how the strands in this example run from the weaver's side to the anchor rod beyond, all of them passing through the cards from the back to the printed front.

Some tablet-weaving instructions call this "Z direction threading."
When the strands run through from front to back, it's called "S direction threading." When there is a mixture of Z and S threading, or alternate threading, the weaving will lie flat instead of twisting.
ALTERNATE THREADING: in Norwegian called Stocking Stitch Effect
Here is an example of alternate threaded tablet weaving. Compare the close up view with the example just above. See the difference in the patterns? Each "bit" of warp that shows in the patterns is in a tiny diamond shape. In alternate threading, they appear in mirror image pairs.
This piece of weaving lies perfectly flat. (A pattern found on reins in Finland; this weaving was made with a light-weight wool yarn that gave some trouble: being fuzzy, the strands tended to cling to each other.)
This sample uses a weft of the same color as the warp strands in the borders, rendering the weft invisible to the casual glance. Look a few photos back to see the contrasting weft (black) appearing in dashes on the edge of the multi-colored warp.

In the close up view below, we look between two adjacent cards. On the left is a Z-threaded card. On the right is an S-threaded card. (or vice versa...I'm dyslexic that way... I hope you get the idea anyway!) Notice the pipe cleaner threaded through the deck of cards to keep them from getting out of order when set aside.

There are various ways to bunch and fasten the warp at the weaver's side and far side of the weaving. Below is a Lark's Head Knot. Sometimes I use this when the pattern lends itself to warp strands coming in pairs of the same color. Then I simply cut warp twice as long as needed, and fasten with this knot to an anchor rod at the far end of the weaving.

The third photo from the top, in the sampler that has four different colored strands in each card, shows how I knotted the strands for each card, then tied a Lark's Head Knot.
With a wide weaving, you might need the following technique to fasten the warp strands at the weaver's side of the weaving. Tying in batches allows you to adjust the tension on the warp in sections, since tensioning is trickier when you have many cards to handle.
This sample had 16 cards. I divided them into batches of 5, 6, and 5, then tied with a bow knot, which allowed retying after testing the tension.

The "twisted" sample at the top of this page was simply gathered into one big knot at the weaver's end.
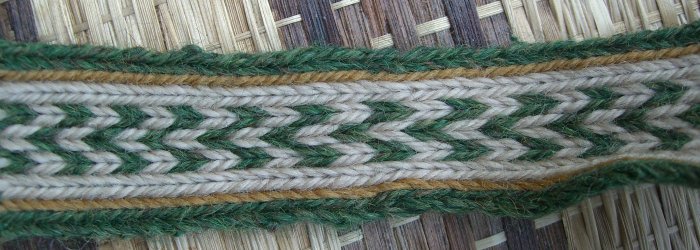
One more sampler: Another way to keep your woven band from twisting
The weaving below has alternate threading only on the borders. Besides the borders, the left half of the weaving is all Z-threaded and the right half is all S-threaded. The twists balance each other out to create an untwisted band.

Continuous turning of the cards produces a series of triangles, as seen at the right of the band. Turning four times forward, then four times backward, and so on, produces diamond shapes: triangles merged with their mirror images.
Notice, though, how ragged that makes the border, as shown at the middle of the band in the photo above. To solve this problem, turn the border cards separately from the inner cards, and make sure to turn the border cards continually in one direction instead of reversing, as done with the left-most diamond, seen above.

This sampler was made out of crochet cord, knotted at the weaver's end, with an old shoelace attached just above the knot for tying to the weaver's belt.
For a small project like this, a pencil made a good anchor bar at the far end as shown below, though a simple knot would work just as well. This one was warped with double-length strands, but they didn't come in evenly matched pairs. You can see some crossing of strands to get the cards properly threaded. That shouldn't be a problem when using such light-weight cords.

A rubberband on the end of the anchor rod keeps the warp ends from slipping off. (I really must find a period solution to take the place of rubberbands and pipe cleaners! They were just so easy to come by...)
A couple more tips
- Crochet cord is much easier to work with than fuzzy wool yarns. I strongly recommend learning tablet weaving with crochet cord before trying more finicky materials.
- Stocking weight yarn produces finer patterns than the heavier worsted yarns.
Still to come
- drafting patterns
- calculating yardage
- threading the cards
- tensioning the warp
- "backstitching" the weft at beginning and end of the weaving

Intro to Tablet Weaving, June 12, 2012
Comments and inquiries: authorjoyceholt(at)gmail.com